


Laravel is unsurprisingly one of the most popular PHP frameworks. It has many unique features that make it one of the best-rated options for web developers.
It also has great documentation and loves well-done source code which translates into very expressive code syntax. Fast, efficient and user-friendly – Laravel.
Here’s how you can install Laravel Ubuntu. This installation uses 18.04 but should work with Ubuntu 16.04 as well.
Laravel – the PHP Framework for Code Lovers How to Install Laravel on Ubuntu
- Install Apache Web Server
- Install PHP
- Download and Install a Database Manager
- Install Composer
- Install Laravel on Ubuntu Using Composer Using Laravel for Local Development Using Laravel to Deploy an Application Uninstall Laravel and Composer
How to Install Laravel on Ubuntu Before we start, you’ll need to SSH into your virtual private server. Here’s a helpful tutorial to help you along!
Following the steps below will walk you through the easiest way to install Laravel on Ubuntu:
- Install Apache Web Server For Laravel to work, you’ll need Apache. It is one of the most popular HTTP server tools, so it’s likely that your VPS has it installed. Luckily, you can check easily! Once you connect to your server using SSH, verify that an Apache system service exists. To do so, we have to run this command.
sudo systemctl status apache2
As you can see, on our VPS there is no Apache service, so we have to install it. To do this, execute the following command.
sudo apt install apache2
Ubuntu by default starts the Apache service and makes it boot during system loading.
Now, if you’re using a firewall, it is necessary to establish a rule in the Firewall so that Apache can run smoothly. If you have no firewall installed, feel free to skip this step.
sudo ufw allow “Apache Full”
After that, we can check the Apache service status again.
sudo systemctl status apache2
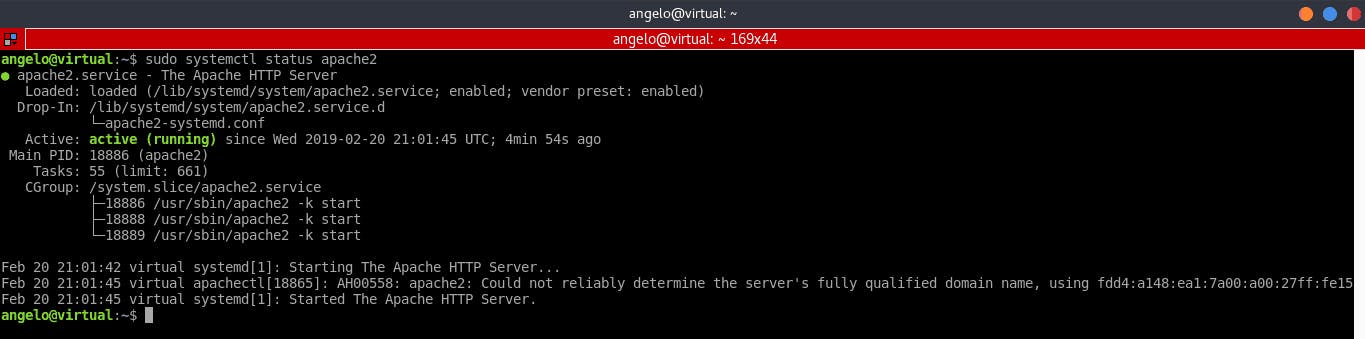
Finally, open a web browser and we go to the IP address of your server or its domain name.
If you see this screen, that means Apache is up and running.

- Install PHP The next step is to install PHP. Fortunately, PHP 7 comes by default in Ubuntu’s official repositories, which makes the installation very easy. You will need to install the language itself and some extra modules. To do this, execute the following command:
sudo apt install php libapache2-mod-php php-mbstring PHP-xmlrpc PHP-soap php-gd php-xml php-cli php-zip php-bcmath php-tokenizer PHP-JSON PHP-pear
If the following command produced an output saying some packages were not found, simply update your Ubuntu by running the following command, and rerun the previous one:
apt-get update
Now, we can test if PHP is working correctly. To do this, we need to create a file in Apache’s root directory. Let’s call it test.php. Run the following command:
sudo nano /var/www/html/test.php
And add the call to the phpinfo function.
<?php phpinfo(); ?>
We have to save it and close it. To save, hit CTRL+O, and to exit, hit CTRL+X Then, open the web browser and go to Your-serverIP/test.php.
If you see this screen, you can be sure that PHP is working as it should.

- Download and Install a Database Manager If we are going to develop using Laravel in Ubuntu 18.04, for that it is necessary to install a database manager. Laravel supports PostgreSQL, MySQL, MariaDB, SQLite, and SQL server. We can install and configure the one we want. For this tutorial, we will install MariaDB.
sudo apt install mariadb-server
After that, you can set a password for the root. To do this, you need to use the mysql_secure_installation script. Keep in mind that this step is optional, but recomended for security reasons.
sudo mysql_secure_installation
After we define the root password, we will be asked several MariaDB configuration questions. The answers you should input are next to the lines of code:
Remove anonymous users? [Y/n] y Disallow root login remotely? [Y/n] n Remove test database and access to it? [Y/n] y Reload privilege tables now? [Y/n] y
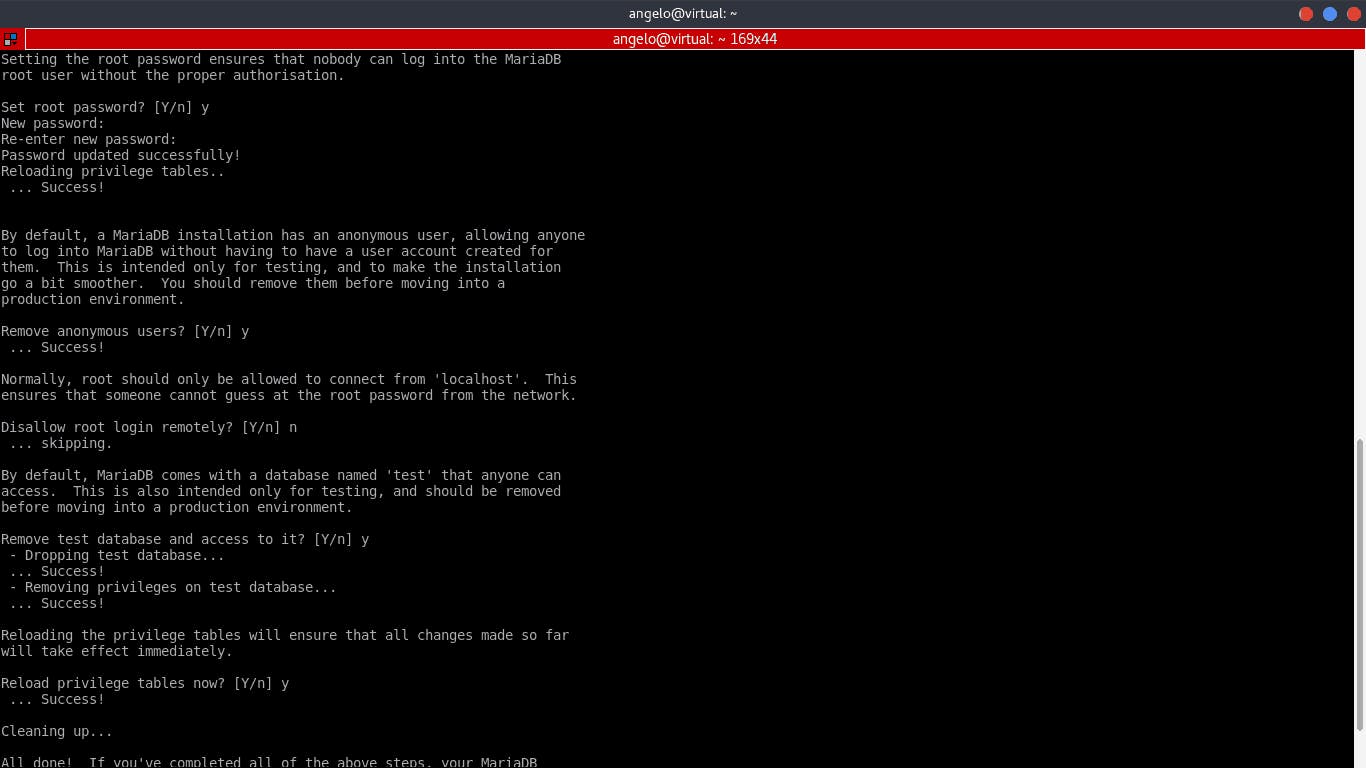
Congratulations, MariaDB was installed successfully.
VPS Mar 17, 2022
Edward S.
5min Read
How to Install Laravel on Ubuntu 18.04 with Apache How to Install Laravel on Ubuntu 18.04 with Apache There are many powerful PHP frameworks, but many of them, because of their structure do not read the source code of the application. This can be a problem if you want to document application code.
Laravel with Apache is a great solution! This PHP framework can efficiently order and compress source code. In this tutorial, we will show you how to install Laravel with Apache on Ubuntu 18.04.
Download Complete Linux Cheat Sheet
Laravel – the PHP Framework for Code Lovers Laravel is unsurprisingly one of the most popular PHP frameworks. It has many unique features that make it one of the best-rated options for web developers.
It also has great documentation and loves well-done source code which translates into very expressive code syntax. Fast, efficient and user-friendly – Laravel.
Here’s how you can install Laravel Ubuntu. This installation uses 18.04, but should work with Ubuntu 16.04 as well.
Laravel – the PHP Framework for Code Lovers How to Install Laravel on Ubuntu
- Install Apache Web Server
- Install PHP
- Download and Install a Database Manager
- Install Composer
- Install Laravel on Ubuntu Using Composer Using Laravel for Local Development Using Laravel to Deploy an Application Uninstall Laravel and Composer How to Install Laravel on Ubuntu Before we start, you’ll need to SSH into your virtual private server. Here’s a helpful tutorial to help you along!
Following the steps below will walk you through the easiest way to install Laravel on Ubuntu:
- Install Apache Web Server For Laravel to work, you’ll need Apache. It is one of the most popular HTTP server tools, so it’s likely that your VPS has it installed. Luckily, you can check easily!Once you connect to your server using SSH, verify that an Apache system service exists. To do so, we have to run this command.
sudo systemctl status apache2 As you can see, on our VPS there is no Apache service, so we have to install it. To do this, execute the following command.
sudo apt install apache2 Ubuntu by default, starts the Apache service and makes it boot during system loading.
Now, if you’re using a firewall, it is necessary to establish a rule in the Firewall so that Apache can run smoothly. If you have no firewall installed, feel free to skip this step.
sudo ufw allow “Apache Full” After that, we can check the Apache service status again.
sudo systemctl status apache2 Apache server status command output on Ubuntu Finally, open a web browser and we go to the IP address of your server or its domain name.
If you see this screen, that means Apache is up and running.
Apache default screen on a browser
- Install PHP The next step is to install PHP. Fortunately, PHP 7 comes by default in Ubuntu’s official repositories, which makes the installation very easy. You will need to install the language itself and some extra module. To do this, execute the following command:
sudo apt install php libapache2-mod-php php-mbstring php-xmlrpc php-soap php-gd php-xml php-cli php-zip php-bcmath php-tokenizer php-json php-pear If the following command produced an output saying some packages were not found, simply update your Ubuntu by running the following command, and rerun the previous one:
apt-get update Now, we can test if PHP is working correctly. To do this, we need to create a file in Apache’s root directory. Let’s call it test.php. Run the following command:
sudo nano /var/www/html/test.php And add the call to the phpinfo function.
<?php phpinfo(); ?> We have to save it and close it. To save, hit CTRL+O, and to exit, hit CTRL+X Then, open the web browser and go to Your-serverIP/test.php.
If you see this screen, you can be sure that PHP is working as it should.
PHP info screen on a browser
- Download and Install a Database Manager If we are going to develop using Laravel in Ubuntu 18.04, for that it is necessary to install a database manager. Laravel supports PostgreSQL, MySQL, MariaDB, SQLite and SQL server. We can install and configure the one we want. For this tutorial we will install MariaDB.
sudo apt install mariadb-server After that, you can set a password for the root. To do this, you need to use the mysql_secure_installation script. Keep in mind that this step is optional, but recomended for security reasons.
sudo mysql_secure_installation After we define the root password, we will be asked several MariaDB configuration questions. The answers you should input are next to the lines of code:
Remove anonymous users? [Y/n] y Disallow root login remotely? [Y/n] n Remove test database and access to it? [Y/n] y Reload privilege tables now? [Y/n] y Maria DB configuration on ubuntu Congratulations, MariaDB was installed successfully.
- Install Composer Composer is a PHP dependency manager that facilitates the download of PHP libraries in our projects. Composer both works great with and makes it much easier to install Laravel.
First, we need to download Composer.
curl -sS getcomposer.org/installer | PHP
Next, we have to make sure Composer can be used globally and make it executable. The following commands will take care of that.
sudo mv composer.phar /usr/local/bin/composer
sudo chmod +x /usr/local/bin/composer
- Install Laravel on Ubuntu Using Composer With Composer installed, now we can install Laravel. To do this, run the following command:
composer create-project --prefer-dist laravel/laravel blog "5.8.*"( you can add the latest too)
Of course, we have to replace [project_name] with the name of your application. In this case, we name the project example.